고정 헤더 영역
상세 컨텐츠
본문
이 글 소스에는 버그가 있었당.~~ ㅠㅠ (부끄럽당. 수정하였당!)
또 누군가는 리액트로 풀캘린더 API가 잘 안된단당...
괘안탕. 얼마든지 그럴 수 있단당당.
왱? 직접 만든게 아니고옹, 가져다 쓰는 거랑 그럴수 밖에 없는 부분이 존재한당.
익숙해 지려면 그 시작은 만든 사람들의 문서일꺼이당.
https://fullcalendar.io/docs/react
https://github.com/fullcalendar/fullcalendar-examples/tree/main/react18
문서에서의 시작보다 샘플 베이스코드 시작이 더 흐뭇한 감동일 수 있당.
vite로 프로젝트 폴더를 맹글었다 치공 달려보장.~~
필요한 모듈 설치 (mui는 그저 개인적 목표 취향이당)
npm install @mui/material @emotion/react @emotion/styled
npm i @fullcalendar/core
npm i @fullcalendar/react
npm i @fullcalendar/daygrid
npm i @fullcalendar/timegrid
npm i @fullcalendar/interaction
초우 간단 샘플로 시작하당.
MyCalendar.jsx
import FullCalendar from '@fullcalendar/react'
import dayGridPlugin from '@fullcalendar/daygrid'
import timeGridPlugin from '@fullcalendar/timegrid'

function MyCalendar() {

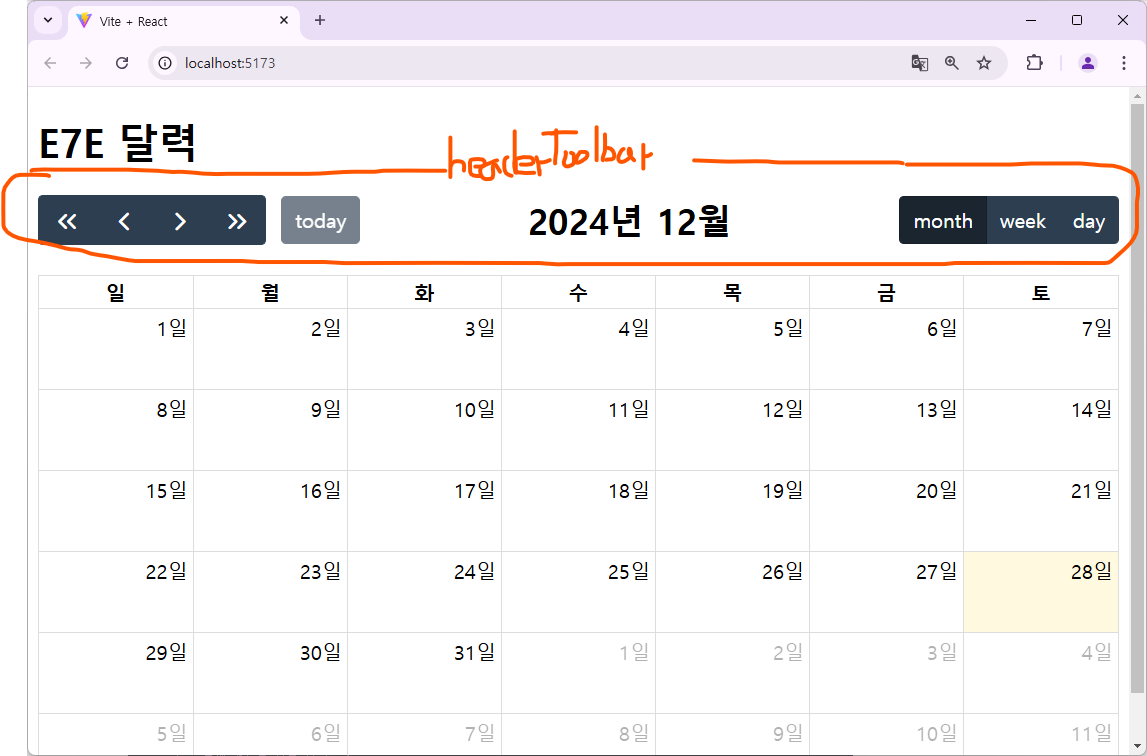
  const headerToolbar = {
    left: 'prevYear,prev,next,nextYear today',
    center: 'title',
    right: 'dayGridMonth,dayGridWeek,timeGridDay'
  }

  return (
    <div>
        <h1>E7E 달력</h1>
        <FullCalendar
            locale={"kr"}
            headerToolbar = {headerToolbar}
            plugins={[dayGridPlugin,timeGridPlugin]}
            initialView='dayGridMonth'
            height={"90vh"}

        />
    </div>
  )
}

export default MyCalendar
위의 코드를 투영하장.
App.jsx
import MyCalendar from "./MyCalendar"

function App() {

  return (
    <>
      <MyCalendar />
    </>
  )
}

export default App
결과는 아래와 같을 지어당. 쉽당.

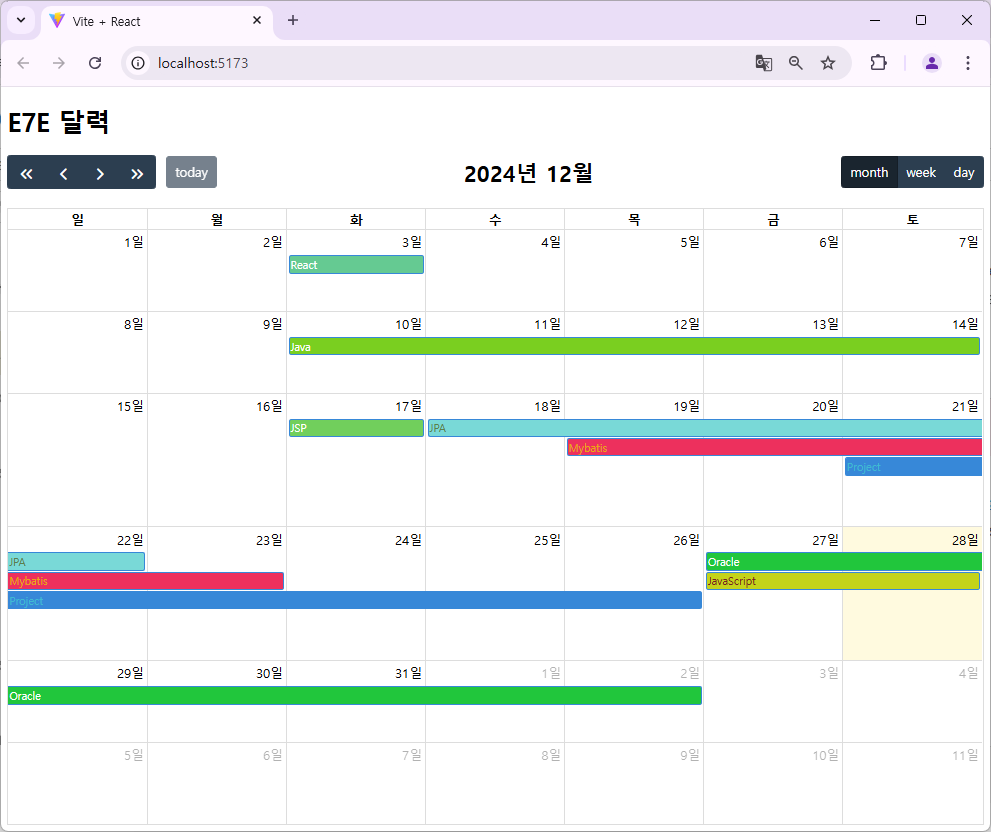
일정이 없어서 재미없당. 가짜로 쪼메만 맹글어 넣어보장
( id, title, start, end 등 중요 기본 속성을 눈으로 확인하장. 나머진 별로 중요)
makeEvents.js
// 년, 월, 마지막날짜 리턴, 괘니 쪼금 이상하게 짜봄
function getYearMonthLastday() {
  const now = new Date();
  console.log("체킁: ", now.toISOString());
  now.setMonth(now.getMonth() + 1);
  now.setDate(0);

  const ymd = now.toISOString().split("T")[0].split("-"));
  return ymd;
}

// 랜덤 칼라
function getColor(){
    let hexaString = "";
    for(let i=1; i<=3; i++){
        hexaString += Math.floor(Math.random()*255).toString(16)
    }
    return `#${hexaString}`;
}

// 배열 데이터 섞기
function shuffle(arr){
    let curInx = arr.length;

    while (curInx != 0) {

      let ranInx = Math.floor(Math.random() * curInx);
      curInx--;

      [arr[curInx], arr[ranInx]] = [arr[ranInx], arr[curInx]];
    }
}

// 가짜 일정 맹그는 함수
function makeEvents() {
    const titls = ["Oracle","Java","JavaScript","React","JSP",
                   "Mybatis","JPA","Spring","Node","Project"];
    shuffle(titls);
    const comments = ["흥","치","피","컥","헉","얌","어","케","혹","앙"];

    const myEvents = [];
    const ranCnt = Math.floor(Math.random() * 3) + 7;
    const [year,month,lastday] = getYearMonthLastday();
    console.log(year,month,lastday);

    for (let i = 1; i <= ranCnt; i++) {
        let startDay = Math.ceil(Math.random()*lastday)
        if(startDay < 10 ) startDay = "0" + startDay;

        let temp = new Date(`${year}-${month}-${startDay}`)
        temp.setDate(temp.getDate() + Math.ceil(Math.random()* 7))
        let endYear = temp.getFullYear();
        let endMonth = temp.getMonth()+1;
        if(endMonth < 10 ) endMonth = "0" + endMonth;

        let endDay = temp.getDate();
        if(endDay < 10 ) endDay = "0" + endDay;

        let mEvent = {
            "id": `cal${i}`,
            "title": titls[i],
            "start": `${year}-${month}-${startDay}`,
            "end": `${endYear}-${endMonth}-${endDay}`,
            "allDay": true,  // 일단 심플하겡
            "backgroundColor": getColor(),
            "textColor": getColor(),
            "extendedProps": {
                "comment": comments[i]
            }
        }

        myEvents.push(mEvent);
    }
    return myEvents;
}

export default makeEvents;
위 코드를 적용해 보장.
MyCalendar.jsx
import FullCalendar from '@fullcalendar/react'
import dayGridPlugin from '@fullcalendar/daygrid'
import timeGridPlugin from '@fullcalendar/timegrid'
import makeEvents from './makeEvents'

function MyCalendar() {

  const events = makeEvents();
  //console.log(events);

  const headerToolbar = {
    left: 'prevYear,prev,next,nextYear today',
    center: 'title',
    right: 'dayGridMonth,dayGridWeek,timeGridDay'
  }

  return (
    <div>
        <h1>E7E 달력</h1>
        <FullCalendar
            locale={"kr"}
            headerToolbar = {headerToolbar}
            plugins={[dayGridPlugin,timeGridPlugin]}
            initialView='dayGridMonth'
            height={"90vh"}
            events={events}
        />
    </div>
  )
}

export default MyCalendar
결과는 새로고침 할 때마다 새로운 이벤트(일정)이 들어갈 거이당.
(있어 보인당.~~)

쪼메 더 쓸만한 베이스 코드의 필요성이 머리에 떠오른당.
(훌륭하당. 당신은 개발자의 직관을 가졌음이 분명하당. 아래 코드가 분명 도우미 될꺼당!)
MyCalendar.jsx
import dayGridPlugin from '@fullcalendar/daygrid'
import interactionPlugin from '@fullcalendar/interaction'
import FullCalendar from '@fullcalendar/react'
import timeGridPlugin from '@fullcalendar/timegrid'
import { Dialog, DialogContent } from '@mui/material'
import { useEffect, useRef, useState } from 'react'
import makeEvents from './makeEvents'

function MyCalendar() {

    // 헤더 설정
    const headerToolbar = {
        left: 'prevYear,prev,next,nextYear today',
        center: 'title',
        right: 'dayGridMonth,dayGridWeek,timeGridDay'
    }

    const [events, setEvents] = useState([]);

    useEffect(() => {
        setEvents(makeEvents());
    }, [])


    // 일정 출력모습 커스터 마이징
    const renderContent = (info) => {
        console.log("체킁: ", info)
        return (
            <div className="fc-event-title-container">
                <div className="fc-event-title fc-sticky">
                    <span style={{ fontSize: "1.2em", fontWeight: "bolder" }}>{info.event.title}</span>
                </div>
            </div>
        )
    }

    const fullCalRef = useRef(null);
    const titleRef = useRef(null);
    const startDayRef = useRef(null);
    const endDayRef = useRef(null);
    const fgColorRef = useRef(null);
    const bgColorRef = useRef(null);

    const [open, setOpen] = useState(false)
    const [title, setTitle] = useState("");
    const [startDay, setStartDay] = useState("");
    const [endDay, setEndDay] = useState("");

    const [fgColor, setFgColor] = useState("")
    const [bgColor, setBgColor] = useState("")

    const handleTitle = (e) => {
        setTitle(e.target.value)
    }

    const handleStartDay = (e) => {
        setStartDay(e.target.value)
    }
    const handleEndDay = (e) => {
        setEndDay(e.target.value)
    }

    const handleFgColor = (e) => {
        setFgColor(e.target.value)
    }
    const handleBgColor = (e) => {
        setBgColor(e.target.value)
    }

    const handleClose = () => {
        setOpen(false)
    }

    // 일정 클릭
    const onEventClick = (info) => {
        info.el.style.border = '2px solid red'
    }

    // 날짜 영역 마우스 클릭  or 드래그
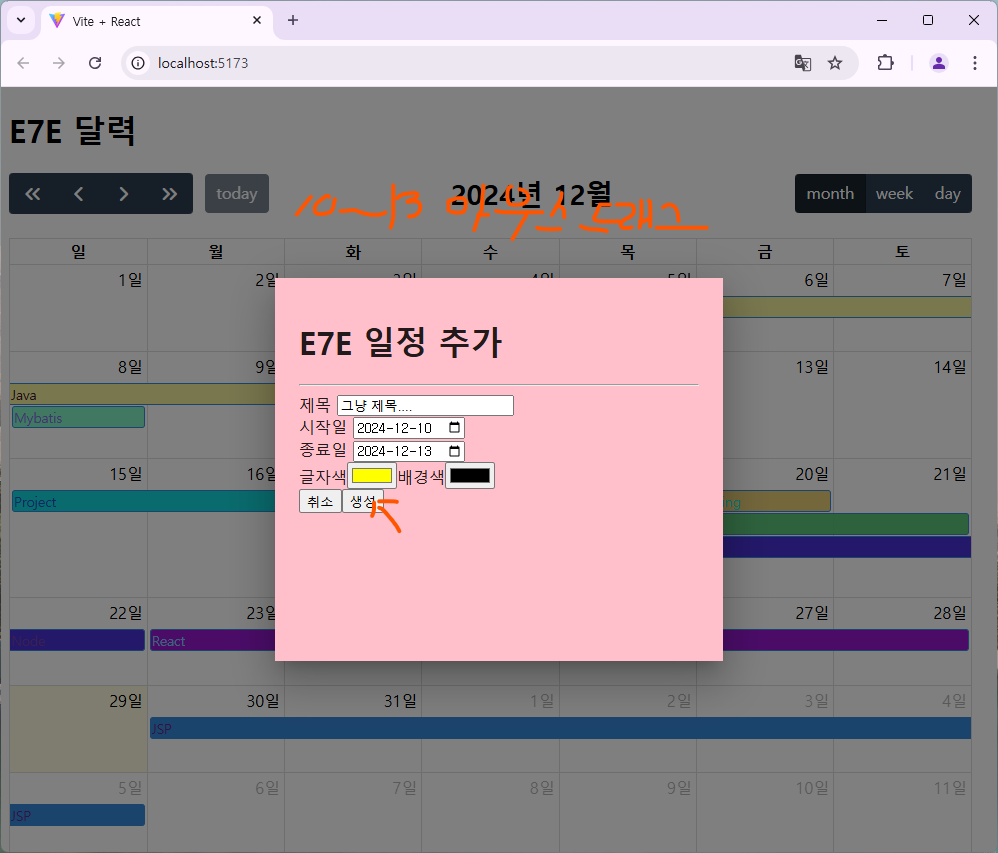
    const onSelect = (info) => {
        alert("체로롱");
        console.log("체킁 sel", info)
        setStartDay(info.startStr)
        setEndDay(info.endStr)
        setBgColor("#000000")
        setFgColor("#ffff00")
        setTitle("그냥 제목....")
        setOpen(true)
    }


    const handleCreate = () => {
        const calApi = fullCalRef.current.getApi();
        calApi.addEvent({
            title : title ,
            start: startDay,
            end: endDay,
            textColor: fgColor,
            backgroundColor: bgColor
        })
        setOpen(false)
    }

    return (
        <>
            <Dialog
                keepMounted={true}
                fullScreen={true}
                open={open}
                onClose={handleClose}
                sx={{
                    display: "flex",
                    height: "50%",
                    m: "auto auto",
                    justifyContent: "center"
                }}
            >
                <DialogContent  sx={{
                    width: 400,
                    backgroundColor: "pink",
                }}>
                    <h1>E7E 일정 추가</h1>
                    <hr />
                    <div>
                        제목 <input type="text" ref={titleRef} value={title} onChange={handleTitle} />
                    </div>
                    <div>
                        시작일 <input type="date" ref={startDayRef} value={startDay} onChange={handleStartDay} />
                    </div>
                    <div>
                        종료일 <input type="date" ref={endDayRef} value={endDay} onChange={handleEndDay} />
                    </div>
                    <div>
                        글자색<input type="color" ref={fgColorRef} value={fgColor} onChange={handleFgColor} />
                        배경색<input type="color" ref={bgColorRef} value={bgColor} onChange={handleBgColor} />
                    </div>
                    <button autoFocus onClick={handleClose}>
                        취소
                    </button>
                    <button onClick={handleCreate}>
                        생성
                    </button>
                </DialogContent>
            </Dialog>
            <div>
                <h1>E7E 달력</h1>
                <FullCalendar
                    ref={fullCalRef}
                    locale={"kr"}
                    headerToolbar={headerToolbar}
                    plugins={[dayGridPlugin, timeGridPlugin, interactionPlugin]}
                    initialView='dayGridMonth'
                    height={"90vh"}
                    events={events}
                    editable={true}
                    slotMinTime={"09:00"}
                    slotMaxTime={"19:00"}
                    dayMaxEventRows={3}
                    nowIndicator={true}
                    selectable={true}
                    eventClick={onEventClick}
                    select={onSelect}
                // eventContent={renderContent}
                />
            </div>
        </>
    )
}

export default MyCalendar
특정 날짜를 클릭한 상태로 마우스를 드래그 하면 아래와 같이 실행 될꺼이당.
(코드를 직접 살펴보면 꽤나 도움이 될 지어당)

느끼미가 왔다면 직접 백엔드를 구성하여, 아작스로 일정(event)을 가져와보면
스스로 자만(자기만족) 단계에 접어들게 될 지어랑.
Do You Know? 바람이 가는 길 그 끝에서 바람이 온당.
사람이란 사실을 근거로 우린 같아 보이지만
그 개별 생체리듬과 가락이 다르듯
프로그램 언어들도 코딩언어라 같아 보이지만
그 스타일이 달라 코딩리듬 쿵쿵짝이 다르당.
생체리듬과 맞는 코딩리듬의 언어와 인연을 맺었다면
그저 축하와 부러움의 꽃밭이당.
박자까지 맞는 동료를 얻는다면 오케스트라 협주코딩으로
자본주의의 갑질 테두리 밖 침대에서 잠자게 되리라.
정복하고 소유하려 하지 말자
그저 그 리듬을 느끼고, 그 리듬에 발 구르자.
Feel React Rhythm
https://www.youtube.com/watch?v=xjzMgH_V16M
'React' 카테고리의 다른 글
| 도커(Docker) 이미지로 맹글깅 (0) | 2025.02.20 |
|---|---|
| React(리액트) 티키타카 20 ( useState 훅 동작 감 잡아보기) (0) | 2024.12.30 |
| React(리액트) 티키타카 17 (react-quill-new 에디터) (0) | 2024.12.25 |
| React(리액트) 티키타카 16 (DHTMLX Gantt 차트) (0) | 2024.12.21 |
| 그냥 E7E만 보는 클릭킁 체킁 (0) | 2024.10.26 |


