고정 헤더 영역
상세 컨텐츠
본문
좀 더 일찍 나왔으면 좀 더 많이 흥행했을 서버사이드 템플릿엔진 타임리프(thymeleaf) !!
RestFul이 대세이긴 하지만 그 나름 프로젝트 규모나 성격,고객의 요청 상황에 따라서는
너무도 훌륭한 선택이 될 수 있을 거시당. RestFul과 Mixed는 어떨깡?
확장자를 html로 사용하기에 개인적으론 너무도 미친 듯 맘에 든당.
jsp를 사용해 본 경험을 가진 당신이라면 꽤나 비슷함에 흡족할 것이당.
ThymeLeaf의 최대 장점이라면 확장자가 html이어서 그대로 브라우져에서 모양확인이
된당. (곧 웹 디자이너와의 협업도 Good! 이란 이야기당~~ ^-^)
버들잎 순풍타고 땅이 아닌 하늘로 거슬러 오르 듯 띠작해 보장.
Boot 3를 써야 하닝, 난 JDK는 21에(17이상 OK), STS4 4.21 버젼을 쓴당.
혹 머릿속이 우앙좌앙 양쪽에서 울고 있다면
2022.10.27 - [스프링부트] - sts4 spring boot 첫번쨍
부텅
2023.07.04 - [스프링부트] - sts4 spring boot 세번쨍
까정 먼저 한번 읽어 보길 강제하지 안코 권장 해 본당.
File -> New -> Spring Starter Project를 선택 아래처럼 입력한당

다음 화면에서 아래와 같은 Dependencies를 선택하공, Finish를 꾸욱 누른당.

pom.xml을 보면 아래 2가지는 이미 포함되어 있는 걸 확인 할 수 있당.
		<dependency>
			<groupId>org.springframework.boot</groupId>
			<artifactId>spring-boot-starter-thymeleaf</artifactId>
		</dependency>
		<dependency>
			<groupId>org.thymeleaf.extras</groupId>
			<artifactId>thymeleaf-extras-springsecurity6</artifactId>
		</dependency>
Thymeleaf의 레이아웃(layout)도 사용 해 볼거닝, 아래 라이브러리를 복사해서
괜시리 무심하고 덤덤한 표정으로 pom.xml에 붙여 넣어본당.
		<dependency>
			<groupId>nz.net.ultraq.thymeleaf</groupId>
			<artifactId>thymeleaf-layout-dialect</artifactId>
		</dependency>
Help -> Eclipse Marketplace 에서 thymeleaf로 검색해서 아래 plugin을 설치한당.
(thymeleaf 컨트롤+ 스페이스 자동완성 플러근이당. 미리 미리 준비하장)

타임리프를 사용하기 위한 기본 설정이 필요하당
src/main/resources 아래에 있는 application.properties 파일에 아래 내용 추가한당.
spring.application.name=thyme
logging.level.com.e7e.thyme=debug
logging.level.org.springframework.security=debug
spring.thymeleaf.enabled=true
spring.thymeleaf.cache=false

# 아래 내용은 default라 안해도 됨 그냥 참고롱
#spring.thymeleaf.check-template-location=true
#spring.thymeleaf.prefix=classpath:/templates/
#spring.thymeleaf.suffix=.html
한가지 더 미리 하고 가장. 아직 시큐리티 동작은 구지 필요가 없으닝,
모든 사용자 요청을 허락해 주는 세팅을 해줌으로써 시큐리티를 disable 시키장
com.e7e.thyeme.config 패키지를 맹글고, 아래와 같은 파일을 맹글장.
SecurityConfig.java
package com.e7e.thyme.config;

import org.springframework.context.annotation.Bean;
import org.springframework.context.annotation.Configuration;
import org.springframework.security.config.annotation.web.builders.HttpSecurity;
import org.springframework.security.web.SecurityFilterChain;

@Configuration  // 설정파일임을 표시
public class SecurityConfig {

	@Bean   // 모든 요청을 허락, 곧 시큐리티 의미없음 => disable
	protected SecurityFilterChain filterChain(HttpSecurity http) throws Exception {
		return http.authorizeHttpRequests(cus-> cus.anyRequest().permitAll()).build();
	}
}
대략 준비가 끝났음이당. (무언가 빠졌다면 디버깅을.....)
레이아웃 만드는 법 부터 보도록 하장.
레이아웃 잡는 법은 너무 하나 하나 따지지 말공, 한번만 이해한 다음에
어디를 고치면 되는지만 파악하고, 그 다음부터는 통째로 복사/붙여넣기 한 다음에.
필요한 부분만 추가/ 수정 하는 방식을 권장한당. (샘플을 잘 관리하장)
조건문/반복문이 아닌 그냥 설정일 뿐이당. (오켕? 시간낭비 없길!)
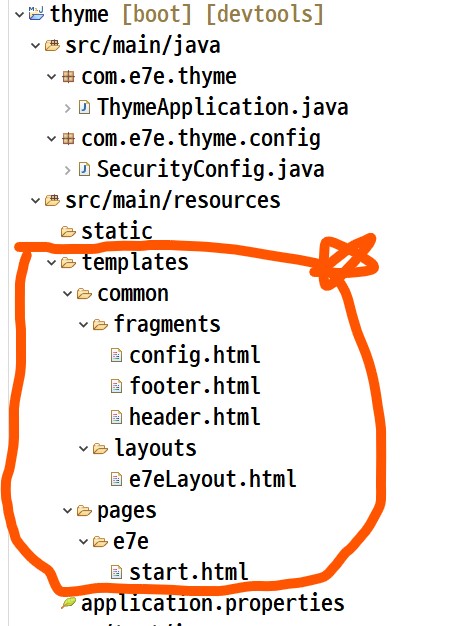
먼저 templates 폴더 아래에 일반적으로 활용되는 아래와 같은 폴더 구조와
html 파일만 미리 맹글어 두고, 파일 내용을 채우도록 하장!
html 페이지 head에 공통으로 들어갈 부분, 난 여기에 jquery와 bootstrap css를 넣었당!
대략 눈으로 훓고 복사/붙여넣기!
config.html
<!--타임리프, ConfigFragment 선언-->
<html lang="ko"
      xmlns:th="http://www.thymeleaf.org"
      th:fragment="ConfigFrag">
    <head>
        <!--공통 Head-->
        <meta charset="UTF-8">
        <title></title>
        <!--공통으로 사용할 JQuery 라이브러리-->
        <script th:inline="javascript" type="text/javascript" th:src="@{//cdnjs.cloudflare.com/ajax/libs/jquery/3.7.1/jquery.min.js}"></script>

        <!--공통으로 쓸  BootStrap CSS -->
        <link th:inline="css" th:href="@{//cdn.jsdelivr.net/npm/bootstrap@4.4.1/dist/css/bootstrap.min.css}" rel="stylesheet"/>
    </head>
</html>
html 페이지 상단(body 상단)에 공통으로 들어갈 부분, 보통 header라고 하디용
header.html
<!DOCTYPE html>
<!-- 타임리프 / headerFrag 임을 선언-->
<html lang="ko"
      xmlns:th="http://www.thymeleaf.org"
      th:fragment="HeaderFrag">
    <div style="background-color:blue">
        <h1>여긴 E7E 헤더예용</h1>
    </div>
</html>
html 페이지 하단에 공통으로 들어갈 부분 정의
footer.html
<!DOCTYPE html>
<!-- 타임리프 선언 / FooterFragment 임을 선언-->
<html lang="en"
      xmlns:th="http://www.thymeleaf.org"
      th:fragment="FooterFrag">
    <div style="background-color: pink">
        <h1>E7E footer예용</h1>
    </div>
</html>
위 3가지 조각(fragment)들 모아서 레이아웃을 맹글어용
e7eLayout.html
<!DOCTYPE html>
<!--라이브러리 참조 : Thymeleaf & Thymeleaf Layout -->
<html lang="ko"
      xmlns:th="http://www.thymeleaf.org"
      xmlns:layout="http://www.ultraq.net.nz/thymeleaf/layout">

    <!--공통 JS / CSS 영역 설정했던 config.html -->
    <head th:replace="common/fragments/config :: ConfigFrag">
        <title layout:title-pattern="$LAYOUT_TITLE : $CONTENT_TITLE">공통 타이틀</title>
    </head>

    <body>
        <!--Header 정의한 영역을 참조. replace는 바꿔치기 -->
        <header th:replace="common/fragments/header :: HeaderFrag"></header>

        <!--Content 내용 영역 나중에 넣을 자리-->
        <th:block layout:fragment="Content"></th:block>

        <!--Footer 정의한 영역을 참조.-->
        <footer th:replace="common/fragments/footer :: FooterFrag"></footer>
    </body>
</html>
Content 영역에 한번 넣어볼 샘플 페이지 작성
start.html
<!DOCTYPE html>
<!-- e7eLayout Import-->
<html
  lang="ko"
  xmlns:th="http://www.thymeleaf.org"
  xmlns:layout="http://www.ultraq.net.nz/thymeleaf/layout"
  layout:decorate="~{common/layouts/e7eLayout}"
  layout:fragment="Content"
>
  <head>
    <title>E7E 샘플페이지</title>

    <!-- inline CSS-->
    <style th:inline="css">
      #divDisp {
        margin: 4px;
        border: 10px groove pink;
      }
    </style>

    <!-- inline JS -->
    <script th:inline="javascript">
      $(() => {
        alert("메에롱 E7E.");
      });
    </script>
  </head>

  <body>
    <div id="divDisp">
      <h1 id="e7e">안농! E7E Content얌.</h1>
      <hr />
    </div>
    <script>
      // 전역
      const divDisp = document.querySelector("#divDisp");
      const ranColor = () => {
        let rgbColor = `rgb(
                              ${Math.round(Math.random() * 255)}
                              ${Math.round(Math.random() * 255)}
                              ${Math.round(Math.random() * 255)}
                              / ${1}
                            )`;

        return rgbColor;
      };
    </script>
    <script type="module">
      // 모듈
      import { faker as fakerKO } from "https://esm.sh/@faker-js/faker/locale/ko";

      let i = 1,
        dir = !0;
      let msg1 = "고마워",
        msg2 = "너무 좋아행";
      for (; i <= 6 && i >= 1; ) {
        let hTag = document.createElement(`h${i}`);
        hTag.innerHTML = `${msg1} Null ${msg2}`;
        hTag.style.textAlign = "center";
        hTag.style.color = ranColor();
        divDisp.appendChild(hTag);

        if (i == 6) {
          dir = !dir;
          msg1 = "미안해";
          msg2 = "사랑하지는 않앙";
        }
        if (dir) i++;
        else i--;
      }
    </script>
  </body>
</html>
핵심은 아래 부분이당. layout 설정부분을 e7eLayout 설정부분과 연결시키면
뇌에서 맵핑이 이루어지고, 이해 안될 이유를 이 우주에선 찾을 수가 없당.
<html
  lang="ko"
  xmlns:th="http://www.thymeleaf.org"
  xmlns:layout="http://www.ultraq.net.nz/thymeleaf/layout"
  layout:decorate="~{common/layouts/e7eLayout}"
  layout:fragment="Content"
>
이제 테스트를 위해서 controller 패키지를 맹글공,
패키지 안에 아래와 같은 컨트롤러 자바 파일을 맹글장.~~
ThymeTestController.java
package com.e7e.thyme.controller;

import org.springframework.stereotype.Controller;
import org.springframework.web.bind.annotation.GetMapping;
import org.springframework.web.bind.annotation.RequestMapping;

import lombok.extern.slf4j.Slf4j;

@Slf4j
@Controller
@RequestMapping("/thyme")
public class ThymeTestController {

	@GetMapping("/e7e")
	public String getE7E() {
		log.info("/e7e에 GET 요청 접수 되었어용");
		return "/pages/e7e/start";
	}

}
실행결과는 (http://localhost:8080/thyme/e7e)는 이쁘진 않지만 아래처럼 원하는 모양이당.

이제 thymeleaf 레이아웃 설정에 대해 어느정도 이해가 되었을 거시다.
요때가 문제당. 알겠다는 느낌이 들었을 때, 한번 더 연습이 필요하당.
본인이 직접 새로운 레이아웃을 만들고, 그것이 적용되는 페이지를 맹글장
[ 복사/붙여넣기 -> 필요한 부분 수정 -> 결과확인 -> 디버깅 -> 성공 (^-^) ]
이제 Thymeleaf가 제공하는 기능 중에 자주 사용되는 기능 몇개 알아보장
가짜 데이타도 쪼메 품위있게 만들기 위해서 아래 faker 라이브러리를
pom.xml에 추가하장!
<dependency>
    <groupId>com.github.javafaker</groupId>
    <artifactId>javafaker</artifactId>
    <version>1.0.2</version>
</dependency>
ThymeTestController.java 파일을 아래 처럼 수정하장
package com.e7e.thyme.controller;

import java.util.ArrayList;
import java.util.HashMap;
import java.util.List;
import java.util.Map;

import org.apache.commons.lang3.LocaleUtils;
import org.springframework.stereotype.Controller;
import org.springframework.ui.Model;
import org.springframework.web.bind.annotation.GetMapping;
import org.springframework.web.bind.annotation.RequestMapping;

import com.github.javafaker.Faker;
import com.github.javafaker.service.FakeValuesService;
import com.github.javafaker.service.RandomService;

import jakarta.annotation.PostConstruct;
import lombok.extern.slf4j.Slf4j;


@Slf4j
@Controller
@RequestMapping("/thyme")
public class ThymeTestController {

	private static List<Map<String, String>> sawonList = new ArrayList<>();

	@PostConstruct
	public void initData() {

		// 준비  Letterify, Numberify, Bothify 3개가 핵심인데 ,더 핵심은 regexify
		FakeValuesService fvs = new FakeValuesService(LocaleUtils.toLocale("ko_KR"),new RandomService());
		Faker myFaker = new Faker(LocaleUtils.toLocale("ko_KR"));

		String name, email,phone,address,company,avatar;
		String[] temp;
		for (int i = 0; i <=20 ; i++) {

			 // 가짜 랜덤 데이터 생성
			 name = myFaker.name().fullName().replace(" ", "");
			 email = fvs.regexify("[a-zA-Z0-9]{8,15}");
			 email += "@" + myFaker.internet().emailAddress().split("@")[1];
			 phone = fvs.regexify("010-[0-9]{4}-[0-9]{4}");
			 address = myFaker.address().state() + " ";
			 address +=myFaker.address().city() + " ";
			 temp = myFaker.address().streetAddress().split(" ");
			 address += temp[1] + " " + temp[0];
  			 company = myFaker.company().name().replace(" ","");
  			 avatar = "https://api.dicebear.com/8.x/personas/svg?seed="+name;

  			 // 묶어서 사원
  			 Map<String, String> sawon = new HashMap<>();
  			 sawon.put("name", name);
  			 sawon.put("email",email);
  			 sawon.put("phone", phone);
  			 sawon.put("address",address);
  			 sawon.put("company",company);
  			 sawon.put("avatar", avatar);

  			 sawonList.add(sawon);
		}

	}


	@GetMapping("/e7e")
	public String getE7E() {
		log.info("/e7e에 GET 요청 접수 되었어용");
		return "/pages/e7e/start";
	}

	@GetMapping("/sample")
	public String getSample(Model model) {
		log.info("/sample에 GET 요청 접수 되었어용");
		model.addAttribute("sawonList", sawonList);
		return "/pages/e7e/sample";
	}

}
@PostConstruct 어노테이션과 Faker 라이브러리를 이용하여
20개의 랜덤 사원정보를 맹글었당.
이제 Thymeleaf에서 달고 살아야 하는 th:each, th:text가 들어간 sample.html을
template/pages/e7e 디렉토리에 아래 처럼 맹글장.
sample.html
<html xmlns:th="http://www.thymeleaf.org">
<head>
	<meta charset="UTF-8">
	<title>E7E ManManse</title>
	<link href="https://cdn.jsdelivr.net/npm/bootstrap@5.0.2/dist/css/bootstrap.min.css" rel="stylesheet">
	<style type="text/css">
		table,tr {
			border: 10px groove skyblue;
		}
		tr {
			border: 1px solid rgb(255,0,255,0.3)
		}
		img {
			border: 3px groove pink;
		}
	</style>
</head>
<body>
<!--
   <p>디버깅1: [[${sawonList[0].avatar}]]</p>
   <p>디버깅2: [(${sawonList})]</p>
 -->
   <h1 style="position:fixed;left:400px; top:50px">E7E 컴퍼니 직원 소개</h1>
   <hr>
   <div th:each="sawon, sawonStat : ${sawonList}">
     <table style="width:400px"  th:object="${sawon}">
    	<tbody>
    	  <tr>
    	  	<td rowspan="2">
    	  	   <img th:src="@{${sawon.avatar}}" alt="no image" width=100 height=100>
    	  	</td>
    	  	<td>이름</td><td th:text="${sawon.name}"></td>
    	  </tr>
    	  <tr>
    	  	<td>회사</td><td colspan="2" th:text="${sawon.company}"></td>
    	  </tr>
    	  <tr>
    	  	<td>전화</td><td colspan="2" th:text="*{phone}"></td>
    	  </tr>
    	  <tr>
    	  	<td>이메일</td><td colspan="2" th:text="${sawon.email}"></td>
    	  </tr>
    	  <tr>
    	  	<td>주소</td><td colspan="2" th:text="*{address}"></td>
    	  </tr>
    	</tbody>
    </table>
    <br>
   </div>
</body>
</html>
실행해보장(http://localhost:8080/thyme/sample) 난 아래와 같당!

sample.html을 샘플로 잘 활용해 주길 기대해 본당. (억지로 외우려 하지 마랑)
이제 마지막으로 thymeleaf에서 spring security 태그 사용법을 보장
필요한 라이브러리는 이미 pom.xml에 다 들어있기 때문에 추가 할 건 없지만,
모든 요청을 허락해서 security를 disable시킨 설정을 먼저 변경해야 한당.
SecurityConfig.java 수정
package com.e7e.thyme.config;

import org.springframework.context.annotation.Bean;
import org.springframework.context.annotation.Configuration;
import org.springframework.security.config.annotation.web.builders.HttpSecurity;
import org.springframework.security.core.userdetails.User;
import org.springframework.security.core.userdetails.UserDetails;
import org.springframework.security.crypto.bcrypt.BCryptPasswordEncoder;
import org.springframework.security.crypto.password.PasswordEncoder;
import org.springframework.security.provisioning.InMemoryUserDetailsManager;
import org.springframework.security.web.SecurityFilterChain;

import jakarta.servlet.DispatcherType;

@Configuration  // 설정파일임을 표시
public class SecurityConfig {


	@Bean   // 모든 요청을 허락, 곧 시큐리티 의미없음 => disable
	protected SecurityFilterChain filterChain(HttpSecurity http) throws Exception {

		//return http.authorizeHttpRequests(cus-> cus.anyRequest().permitAll()).build();

		return http.httpBasic(cus->cus.disable())
		           .formLogin(cus->cus.loginPage("/login"))
		           .userDetailsService(userDetailsService()) // 그냥 명시적 표현,생략가능
		           .authorizeHttpRequests(auth ->
		                                  auth.dispatcherTypeMatchers(DispatcherType.FORWARD, DispatcherType.ASYNC).permitAll()
		                                      .requestMatchers("/login","/error").permitAll()
		    							      .requestMatchers("/ceo/*").hasRole("CEO")
		    							      .requestMatchers("/cfo/*").hasRole("CFO")
		    							      .requestMatchers("/dev/*").hasAnyRole("dev","cfo","ceo")
		    							      .anyRequest()
		    							      .authenticated())
		    .build();

	}

	@Bean
	protected InMemoryUserDetailsManager userDetailsService() {

		UserDetails ceo = User.withUsername("e7e")
				              .password(passwordEncoder().encode("e7e"))
				              .roles("CEO","MGR").build();

		UserDetails cfo = User.withUsername("ksj")
	                          .password(passwordEncoder().encode("ksj"))
	                          .roles("CFO","MGR").build();

		UserDetails dev = User.withUsername("dev")
	                                .password(passwordEncoder().encode("dev"))
	                                .roles("DEV","SAWON").build();

		return new InMemoryUserDetailsManager(ceo,cfo,dev);

	}

	@Bean
	protected PasswordEncoder passwordEncoder() {
		return new BCryptPasswordEncoder();
	}

}
세명의 사용자(e7e,ksj,dev) 그리고 3개의 ROLE(CEO, CFO, DEV)
세개의 URL 패턴 (/ceo/*, /cfo/*, /dev/*)을 정의하고, 로그인 URL을 /login으로 지정 했당.
먼저 GET방식 /login URL요청에 로그인 화면으로 이동 시켜줄 컨트롤러를 맹글장.
com.e7e.thyme.controller 패키지에 아래 파일을 맹글장
LoginController.java
package com.e7e.thyme.controller;

import org.springframework.stereotype.Controller;
import org.springframework.web.bind.annotation.GetMapping;
import org.springframework.web.bind.annotation.RequestMapping;

import lombok.extern.slf4j.Slf4j;

@Slf4j
@Controller
@RequestMapping("/")
public class LoginController {

	@GetMapping("/login")
	public String loginPage() {
		log.debug("로그인 화면 페이지 요청");
		return "login";
	}

	/*
	 * @PostMapping은 만들지 않아요
	 * Spring Security 가 자동으로 처리해줘요
	 */

}
이제 resources/templates 폴더에 바로 login.html을 맹글장
login.html
<html xmlns:th="http://www.thymeleaf.org">
  <head>
    <meta charset="UTF-8" />
    <title>E7E ManManse</title>
    <link
      href="https://cdn.jsdelivr.net/npm/bootstrap@5.0.2/dist/css/bootstrap.min.css"
      rel="stylesheet"
    />
  </head>
  <body>
   <br><br><br>
   <h1>E7E 컴퍼니 Login </h1>
   <hr>
   <form  action="/login" method='POST'>
      <table>
         <tr>
            <td>사원:</td>
            <td><input type='text' name='username' value='e7e'></td>
         </tr>
         <tr>
            <td>암호:</td>
            <td><input type='password' name='password' value="e7e"></td>
         </tr>
         <tr>
            <td colspan="2" style="text-align:center">
                 <input type="hidden"
						th:name="${_csrf.parameterName}"
						th:value="${_csrf.token}" />
                 <input type="submit" value="submit" />
            </td>
         </tr>
      </table>
  </form>
  </body>
</html>
이제 시큐리티가 제대로 동작하는지 검증을 위해서 서버를 다시 실행시키고,
브라우져 주소 표시줄에 (http://localhost:8080/thyme/sample) 써보장.
"/login" 과 "/error" URL 빼고는 모두 인증을 요구하므로 자동으로
로그인 페이지 "/login" URL로 이동 login.html이 화면에 나타나게 된당.

이미 username과 password를 넣어 놓았기 때문에 그냥 로그인 버튼을 누르면
시큐리티가 등록된 사용자 임을 확인하고, 이전에 입력한 URL인
http://localhost:8080/thyme/sample 으로 이동 시켜준다.
간단히 security 관련 태그 확인을 위해 LoginController.java에
아래 코드를 추가하장.
	@GetMapping("/cfo/insa")
	public String ksjPage() {
		log.debug("요청 접수 ");
		return "ksj";
	}
templates 폴던에 ksj.html을 아래처럼 맹글자
ksj.html
<html xmlns:th="http://www.thymeleaf.org"
      xmlns:sec="http://www.thymeleaf.org/extras/spring-security">
<head>
	<meta charset="UTF-8">
	<title>E7E ManManse</title>
	<link href="https://cdn.jsdelivr.net/npm/bootstrap@5.0.2/dist/css/bootstrap.min.css" rel="stylesheet">
</head>
    <body>
        <h2>반가워 금수저</h2>
        <p>시큐리티 태그 몇개 보장</p>
        <div sec:authorize="hasRole('CFO')">CFO는 금수저얌</div>
        <div sec:authorize="hasRole('CEO')">CEO도 못봐</div>
        <div sec:authorize="isAuthenticated()">
            <h1 style="color:blue">인증 받았나봥</h1>
        </div>
        인증된 사원이름
        <div sec:authentication="name"></div>
        인증된 ROLE
        <div sec:authentication="principal.authorities"></div>
    </body>
</html>
이제 브라우져에서 F12를 누르고, application 탭에서 Cookies를 clear 한 뒤에
브라우져 주소 표시줄에 http://localhost:8080/cfo/insa 를 치고
로그인 페이지에서 아이디 / 암호를 e7e/e7e를 치면 에러가 발생하고,
다시 Cookies를 clear한 다음에, http://localhost:8080/cfo/insa 를 치고
로그인 페이지에서 ksj / ksj를 입력하면 아래 처럼 잘 되는 것을 확인 할 수 있당.

URL "/"에 대응하는 GET 맵핑을 1개 더 만들면 편할 거시당.
(여기선 SKIP 이미 난 지쳤당~~ ㅋㅋ)
아래 URL에서 Thymeleaf에서 제공하는 Utility를 확인한다면
훨씬 더 멋지게 hymeleaf를 사용할 수 있겠단 생각이 불현듯 든당.
https://gist.github.com/jorgeacetozi/443e8f422dfbdf9c78a34c8eb25d5693
신을 만드는 길 위에 올라선 인간~
무한대의 기억력,
지치지 않는 체력
어디에도 있고, 어디에도 없는
불멸의 존재~~
그 AI 역시 결국 자신의 신을
만드는 길에 올라서겠지
이 끝없는 무한 루프를 벗어날 방법은
단 하나! 존재하지 않으면 된당.
Null이 있는 인생을 준비하장
지금 당장 무한루프를 즐기고,
Null Exception으로 탈출하자
난 감히 Null 베프(Very Proud)라 부른당.
https://www.youtube.com/watch?v=9rkYUrpfjBQ
'스프링' 카테고리의 다른 글
| MyBatis에서 Oracle Procedure 그냥 불러 보기.... (6) | 2025.08.17 |
|---|---|
| NGROK 무료 static 도메인 (기쁨) (2) | 2024.08.23 |
| Faker 이용 가짜 데이터 맹글기 (0) | 2024.04.10 |
| spring boot 3 security 그냥 한번 해보고 한번 더 해보면 잘 될꺼얼! (2) | 2024.03.19 |
| ftp사용 파일 업로드/다운로드 괘니 구현 (2) | 2023.09.01 |


